
The lists tool in HubSpot allows you to easily create lists of contacts, companies, deals, or custom objects based on their specific property values and other characteristics, such as activities. This article provides step-by-step instructions on how to create and edit lists using the lists tool. If you want to define your list criteria or add records to existing lists, you can learn how to determine criteria or manually add records to static lists.
Additional ways to utilize lists in HubSpot are:
-
Sending targeted marketing emails to a specific group of contacts.
-
Creating a list specifically for contacts whose emails have bounced.
-
Enrolling a list in a workflow to automate certain actions.
-
Using list membership filters to further segment other lists and generate custom reports.
-
Creating ads audiences based on contact and company lists.
-
Sending customer satisfaction surveys to contacts using a static list.
While most of the uses mentioned above are not currently available for company, deal, or custom object lists, you still have the option to create a list to analyze objects that meet specific criteria.
Please note: The number of lists you can create is determined by your subscription. To find out more about your subscription options and any limitations, please refer to the Product & Services catalog.
Types of lists
Your HubSpot account includes two types of lists: active lists and static lists.
Active lists
Active lists automatically update their members based on specific criteria. When records meet the criteria, they are added to the list, and when they no longer meet the criteria, they are removed from the list.
Active lists are useful in various scenarios, such as:
-
Sending personalized marketing emails based on each contact's behavior and properties. For example, if you have a regular newsletter, an active list will continuously update the subscribers' list.
-
Placing outbound calls to contacts based on their behavior and property values.
-
Grouping your contacts by lifecycle stage to identify their behavior and properties at each stage.
-
Segmenting records based on properties that frequently change over time, like the HubSpot score.
Static lists
Static lists are created by selecting records that meet specific criteria at the time of saving the list. These lists do not automatically update, meaning that any new records that meet the criteria will not be added to the list. However, you have the ability to manually add or remove records from static lists as needed.
Examples of when static lists should be used include:
-
Manually adding records to a workflow.
-
Sending one-time email blasts, email campaigns that you don't run often, and for a list of contacts that doesn't change (e.g., event attendees, staff lists for an internal newsletter, or lists from a trade show).
-
Manually grouping records that may not have a shared list criteria.
-
Segmenting to bulk delete records from your account.
Create a list
Users with Write permissions for lists can create lists.
- In your HubSpot portal, navigate to Contacts > Lists.
-
In the upper right, click Create list.
-
In the left panel select:
-
Contact-based to create a list of contacts
-
Company-based to create a list of companies
-
Deal-based to create a list of deals.
-
-
In the right panel, name your list and choose if you want an Active list or a Static list. You can also view the number of lists you've used on this page.
-
In the upper right, click Next.
-
In the left panel, you can define the specific criteria that you want to use to segment your contacts or companies. You have the flexibility to choose from a variety of list criteria options and learn how they work. Additionally, you can apply up to 250 filters per list to effectively segment your data.
-
Add filter.
-
Scroll or type to search, then select a filter category.
-
Within the category, scroll or type to search, then select the property or activity to filter by.
-
Select an option for the property or activity, then set your criteria based on the field type:
-
For dropdown select or checkbox options, simply click on the dropdown menu and choose the checkboxes next to the values you want.
-
When adding text values, click on the Add options field and type in the desired text. If you have multiple options, separate each value with a semicolon (e.g. Boston; Chicago; New York).
-
For numerical values, click on the Add values field and enter the number you want. If you have multiple options, separate each value with a semicolon (e.g. 10; 25; 30). This applies to Number, Score, and Calculation properties.
-
To select a date, click on the calendar field and choose a date from the calendar.
-
-
Please note: A wildcard (*) cannot be used for most text criteria in list filters. However, there is one exception where a wildcard (*) can be used, and that is when using the Page views criteria to check if a contact has (or has not) visited a URL that matches a regular expression.
-
-
By default, when using associated object filters, the list includes records if any associated records meet the criteria. However, if you want to filter based on a primary company association or an association label instead, you can do so by clicking on the Any associated [object] dropdown menu in the left panel, then:
-
-
-
-
Choose Any [object] to filter the list based on all associated records of that object type. For example, if any of the contact's associated companies meet the criteria, the contact will be included in the list.
-
If you're creating a list based on contacts, choose Primary [object] to filter the list based on the primary associated company. This means that the contact will only be included in the list if their primary associated company meets the specified criteria.
-
In the With label section (available in Professional and Enterprise plans), you can choose a label to filter contacts or companies based on their associations with that label. For example, if you select a label, the list will only include contacts or companies that have an associated label and meet the specified criteria.
-
-

-
-
To include more filters in the same category or group, click on Add filter. Additional filters within the same category or group follow the logic of "AND". This means that a record must meet all the criteria within the group in order to be included in the list.
-
-
-
To complete the editing of a filter group, simply click on the X located at the top right corner of the editor.
-
To include additional filters in the same category or group, simply click on the Add filter button and select Add filter group. When multiple filter groups are present, the OR logic applies. This means that a record only needs to meet the criteria of at least one filter group to be included in the list.
-

-
-
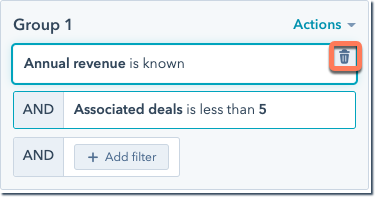
To remove a specific criterion from a filter group, simply hover over the property, activity, or value and click on the delete icon labeled Delete. If you are deleting a category that contains multiple filters, a pop-up box will appear asking you to confirm the deletion. Click on Delete branch to proceed.
-
-
-
Clone or delete a filter group: on the top right of the group, click the Actions dropdown menu, then select Clone or Delete.
-
Test if an existing record meets the filters: in the left panel, click Test. In the dropdown menu, select a record to test.
-
-
In the upper right, click Save list.
After you have entered or selected the criteria for your list, the processing will begin. The records that appear are a preview of the records that will be included in your list. Once the list is saved and fully processed, the exact count of records will be displayed under the list's name in the upper left corner. Once the processing is complete, you can continue making changes to your list.
View and edit a list
Individuals with View permissions for lists can access lists without the ability to make edits. For list editing, it's necessary to possess Write permissions for the respective lists.
To access your Lists within your HubSpot account, follow these steps:
-
Navigate to Contacts > Lists.
-
To access the list you want to view or edit, simply click on it in the table. If you're looking for lists that are not currently being used by other HubSpot tools, you can go to the Unused Lists tab.
-
To find a particular record in your list, simply use the search bar located in the upper right corner.
-
To modify the list's name, click on the edit pencil icon next to the current name, then input the new name. Press the enter key or click away from the text editor to save your changes.
-
To modify the filters of an active list, go to the left panel and click on "Edit Filters". From there, you can make adjustments to your filters and criteria as needed. Once you are done, simply save your changes by clicking on "Save Changes" in the top right corner.
-
You have the ability to sort the records in the table based on their property values by simply clicking on the headers. This allows you to easily organize and arrange the records in a way that is most convenient for you.
-
Click Details in the right hand corner.
-
On the right panel, you will find valuable information about your list. This includes the name and type of the list, as well as the dates it was created and last updated. You can also see the number of contacts that have been changed in the list over the past seven days. In addition, you will find details about the list's creator, List ID, ILS List ID, and how the list is currently being used by HubSpot tools and assets. This information provides valuable insights into the list's performance and usage.
-
The List ID is a special code that serves as a unique identifier for the list. It is used when integrating with other systems or when utilizing the Lists API. This List ID enables seamless connection and interaction with the list across various integrations and applications.
-
The ILD list ID is used in conjunction with the Exports API to facilitate interactions with the list. It acts as a special code that provides a unique identifier, enabling smooth integration and interaction with the list across different applications and integrations.
-
-
-
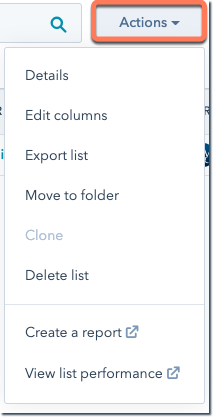
To see other options with your list click the Actions dropdown menu:
-
Edit columns: Choose the properties that you want to appear for each record in the table.
-
Click Save to apply the column configuration to only the selected list.
-
To apply the column configuration to all of your contact or company lists, simply select the checkbox that says Apply to all [contact/company] lists and then click on the Save button.
-
-
Export/Export list: download a copy of the list.
-
Random sample: create a random sample of contacts from a list.
-
-
-
Move to folder: select a list folder to move the list to.
-
Clone: clone the list.
-
Delete list: delete the list. When you no longer need a list in HubSpot, you can easily delete it if it's not actively being used. Don't worry, deleting a list does not remove the records within it. However, it's important to keep in mind that if you delete a static list, it will be permanently deleted. On the other hand, if you delete an active list, you have the option to restore it within 90 days from the Recently deleted tab.
-
-
-
Create a report: build a custom report based on your contact lists.
-
View list performance: Gain valuable insights into your list's performance by analyzing key metrics such as its size over time and the engagement and activity of the contacts within the list. This feature is specifically designed to provide in-depth analysis for contact lists, allowing you to make data-driven decisions and optimize your marketing efforts.
-
Resync list with Salesforce (Professional and Enterprise only): Initiate a synchronization of the list with Salesforce if you have integrated Salesforce with your contacts.
-
Use this list to limit Salesforce Sync (Professional and Enterprise only): If you are using the Salesforce integration, you can designate the list as an inclusion list for contacts that will be synchronized with Salesforce. To learn more about Salesforce inclusion lists for contacts, please refer to our documentation.
-
Convert to static list: convert an active list to a static list.
-
Delete a list
If you have reached the maximum number of lists allowed for your account, you may need to delete a list while preserving its records. However, if you want to delete the actual records within a list, you can learn how to perform a bulk delete. It's important to note that only users with the necessary permissions have the ability to delete lists.
Please note: If you choose to delete a list, there's no need to worry! You can still restore the list within 90 days from the "Recently deleted" tab.
-
Navigate to Contacts > Lists.
-
If you want to see lists that have not been used or updated in the past two months, simply click on the Unused lists tab. Alternatively, you can proceed with deleting the list in the Lists library tab.
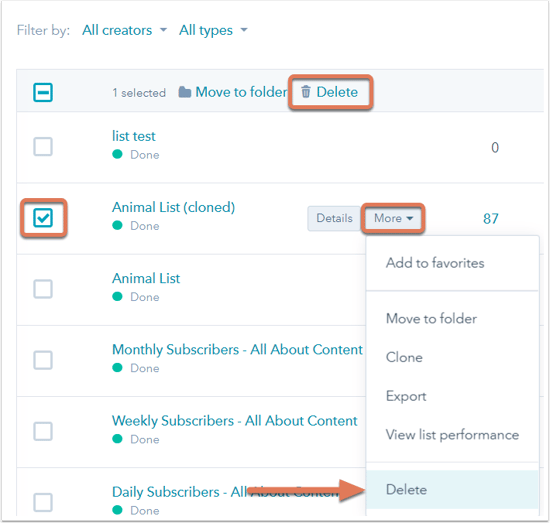
- Hover over a list and click the More dropdown menu yo delete a single list,, then select Delete list.
-
Select the checkboxes next to the lists you want to delete and click Delete at the top of the table to bulk delete lists.
- In the dialog box, click Delete.
Restore a deleted list
If you accidentally delete a list, don't worry! You have up to 90 days to restore the list before it is permanently deleted. Restoring a list will bring back all the records and it will retain the same ID as before. So, you can easily recover any deleted list within the 90-day window.
-
Navigate to Contacts > Lists.
-
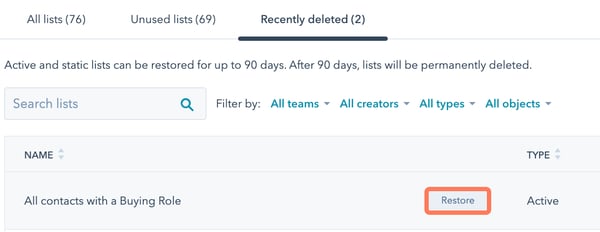
Click the Recently deleted tab.
-
Hover over the list you want to restore and click Restore.
- Click Restore in the dialog box to confirm.
Clone a list
If you have an existing list in HubSpot that you would like to modify or create a copy of, you can easily achieve this by cloning the list and making the required adjustments to the newly created version. This allows you to retain the original list while having the freedom to make any necessary changes without affecting the original data.
-
Navigate to Contacts > Lists.
-
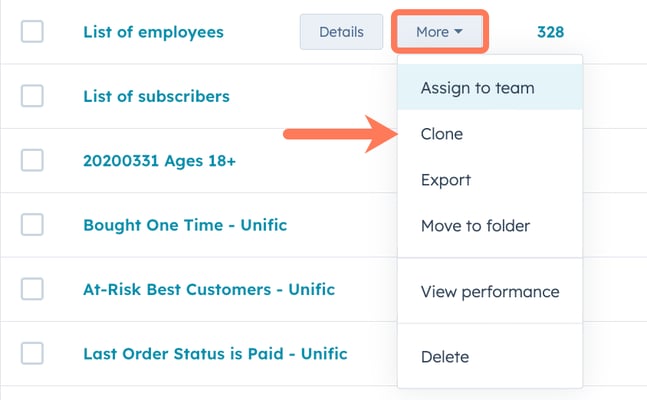
Hover over your list, then click the More dropdown menu and select Clone.
-
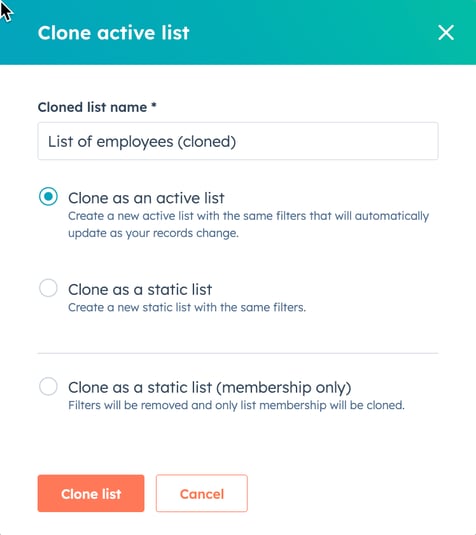
In the popup, change the list's name if needed.
-
Choose one of the following options.:
-
Clone as an active list: creates a new active list with the same filters.
-
Clone as a static list: creates a new static list with the same filters.
-
Close as a static list (membership only): removes the filters and clones only the list membership.
-
-
Click Clone list.
-
Modify the criteria of your list as required, and then click on the "Save list" button located in the top right corner.
.png?width=688&height=229&name=Knowledge%20Base%20Contact%20Us%20CTA%20(4).png)