Owner properties
HubSpot uses the [Object] owner properties to set the ownership of a contact, company, deal, ticket, or custom object record. You can also assign additional owners using a custom HubSpot user field type property. Any users with access to an object can be designated as owners.
Please note: If you have the Salesforce integration enabled, your contact owner assignment will default to what is specified in Salesforce.
Assign an owner from the object's index page
You can bulk assign records to an owner:
- Navigate to your records:
- Contacts: In your HubSpot account, navigate to Contacts > Contacts.
- Companies: In your HubSpot account, navigate to Contacts > Companies.
- Deals: In your HubSpot account, navigate to Sales > Deals.
- Tickets: In your HubSpot account, navigate to Service > Tickets.
- Custom objects: In your HubSpot account, navigate to Contacts > [Custom object]. If your account has more than one custom object, hover over Custom Objects, then select the custom object you want to view.
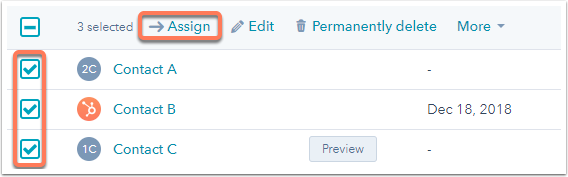
- Select the checkboxes next to the records you want to assign.
- In the table view, select the checkboxes next to the records.
- In the board view for deals and tickets, hover over a record, then select the checkbox. Once one record card is selected, checkboxes will appear on all remaining cards for you to select.
- At the top of the table or board, click Assign.
- In the dialog box, click the [Object] owner dropdown menu and select an owner.
Please note: each record can only have one owner with the [Object] owner property. To assign multiple owners, create a custom property with the HubSpot user field type.
- Click Update.
You can also assign a single record to an owner:
- In the [Object] owner column, click the name of the current owner.

- In the dialog box, click the Assign selected items to this owner dropdown menu and select an owner.
- Click Assign.
Assign an owner from the record
- Navigate to your records:
- Contacts: In your HubSpot account, navigate to Contacts > Contacts.
- Companies: In your HubSpot account, navigate to Contacts > Companies.
- Deals: In your HubSpot account, navigate to Sales > Deals.
- Tickets: In your HubSpot account, navigate to Service > Tickets.
- Custom objects: In your HubSpot account, navigate to Contacts > [Custom object]. If your account has more than one custom object, hover over Custom Objects, then select the custom object you want to view.
- Click the name of a record.
- In the left panel, click View all properties.
- Use the search bar at the top to find the [Object] owner property, then click the dropdown menu under the property and select an owner.
- At the bottom of the screen, click Save.
Assign owners in an import
When you set up your import file and do an import, you can import data to add or update values in the [Object] owner property for the imported records.
To assign an owner to an object during the import, in your import file include a header with the text [Object] owner and add the name or email address of the user to each row in that column.
During the import, HubSpot will match this header to the [Object] owner property. If you're using one of your object's deduplication properties or object ID, HubSpot will check for existing records in your database and update those records. If there is no matching existing record, HubSpot will create a new record. Learn more about setting up your import file, importing your records, and how HubSpot deduplicates records.
Please note: users who are assigned a record through import will not receive a notification that they were assigned a new object.
Assign an owner from a booked meeting
If an unowned contact books a meeting on a user's scheduling page, that user will automatically be assigned as the contact owner. If a contact already has an owner and they book a meeting with a different user, the existing owner will not be replaced.
Assign owners using workflows (Professional and Enterprise only)
Assign one owner to all enrolled records
If you have access to the workflows tool, you can automatically assign ownership to enrolled records using the Set [object] property value action. Select your owner property, then select the user that you want to assign the enrolled objects to.
To automatically assign ownership to your other owners, you can clone your workflow, change the enrollment triggers based on the assignment rules for each owner, and update the selected owner in the Set [object] property value action. You can also use branching logic to assign different owners to your objects based on different criteria.
Rotate records between multiple owners (Sales Hub and Service Hub Professional and Enterprise only)
Paid users in Sales or Service Hub Professional and Enterprise accounts can also rotate assignment between multiple users using workflows. Using this method, the workflow will evenly distribute assignment to the specified owners through the Rotate record to owner action. Only records without existing owners will be assigned. If a record has an owner, you'll need to clear the value first, which can be accomplished in bulk with the Clear property value action.
Distribution of ownership for each rotate action is based on the assignment count for that particular action, not based on how many objects each user owns overall in your account. If you have multiple rotate actions in your workflow, each action will have a separate count. For example, if a Rotate [owner] action is set up for three owners:
- When the workflow is turned on, all three owners for this action will have an assignment count of zero.
- Since all three users have an equal assignment count, the first contact to reach this action will be randomly assigned to one of them.
- After the first contact is assigned, there will be one owner with one lead, and two owners with zero leads. The next contact to go through the workflow will be assigned to one of the remaining two users that don't have any leads yet.
- Once all three owners have been assigned one lead, they will all be eligible to receive the next lead.
.png?width=688&height=229&name=Knowledge%20Base%20Contact%20Us%20CTA%20(4).png)