Create one-on-one scheduling pages so contacts can book meetings with you. Your contacts can access these scheduling pages using a meeting link. If you connect your Gmail of Office 365 calendar, scheduled meetings will sync with your connected calendar so your appointments will always be up-to-date.
Create scheduling pages
- In your HubSpot account, navigate to Sales > Meetings.
Note:
- You can create, edit, and delete scheduling pages for other users if you have Create scheduling pages for others permissions. If you are a super admin or user with Add and edit users permissions, you can grant a user these permissions.
- If Meetings does not appear in navigation menu under Sales, make sure that your user has Sales Access permissions.
- In the upper right, click Create scheduling page.
- In the dialog box, select a meeting option:
- One-on-One: the contact will schedule time with just you or the user you're creating the scheduling pages for.
- Click Next.
- Continue setting up your scheduling page following the steps below.
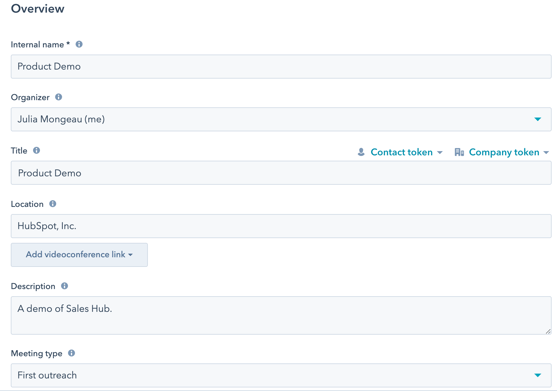
Overview
On the Overview page, edit the scheduling page's basic information.
- Internal name: the name that appears when the meeting link used to access the scheduling page is added to an email.
- Organizer: the meeting owner, or the user the contact is scheduling a meeting with.
- Title: the name of the calendar event you share with your contact. For example, "Product Demo" would appear as event name. You can insert personalization tokens in the subject by clicking Contact token or Company token.
- Location: include information about how and where you will connect with your meeting attendee. This can be a call-in link, a physical location, etc. This location will appear in the contact's calendar invite, and the event created on your default personal calendar.
- Add videoconference link: if you're using HubSpot's integration with Zoom, UberConference, or Google Meet, you can add a videoconference link. If you have not set up a videoconference integration, you will not see this option. If you're using different videoconferencing software, and you're a developer or there's a developer on your team, learn how to use the Video Conference Extension API.
- Description: a description of the meeting that appears in the invite when a meeting is booked. This description will appear in the calendar invite your contact receives and the event created on your default personal calendar.
- Cancel and reschedule: include cancel and reschedule links in the event description, so when a meeting is scheduled the contact can cancel or modify the date and time if needed.
- Meeting type (Sales Hub Professional or Enterprise or Service Hub Professional or Enterprise only): choose a meeting type from the dropdown menu.
Scheduling experience
On the Scheduling experience page, customize your meeting availability and booking form.
- At the top, edit the scheduling page URL. This is the link that contacts will use to book meetings on your calendar, and it cannot be edited after the link is created.
- On the Schedule tab, you can customize the following:
- Title: enter the name that will appear above the calendar on the scheduling page.
- Duration: the length of time visitors can book you for. Click + Add duration to add more options.
- Time zone: click the Time zone dropdown menu and select your time zone. This is the time zone that your availability is based on.
- Available times: use the dropdown menus to set the days of the week and duration of your available time slots. Click + Add hours to add additional time slots.

Note: Your scheduling page's available times will appear in the contact's time zone settings. For example, if the contact's computer is set to Pacific time, the times will appear in Pacific time. The contact's calendar settings determine the date and time of the calendar event sent to the contact after booking a meeting.
- To see additional customization options, click to expand the Additional settings section. Here you can customize the following:
- Image: this image will appear at the top of your scheduling page. Select an image option:
- Organizer's avatar: the meeting organizer's avatar, set in their user profile and preferences, will appear. This option is only available when creating a one-on-one scheduling page.
- Image: this image will appear at the top of your scheduling page. Select an image option:
-
-
- Company avatar: the company avatar associated with the email domain of the user who created the scheduling page will appear. This is populated using HubSpot Insights.
- Custom image: upload a custom image selected from the file manager. Hover over the avatar and click the edit pencil icon, then select Change photo. In the right panel, select an image.
- When a meeting can be scheduled: enter the number of weeks from now that people can book time on your calendar. If you are creating a scheduling page for an event or conference, you can specify a custom date range for booking. Select the Over a period of rolling weeks or Custom date range (users with assigned Sales Hub paid seats only) radio button, then select the number of weeks or use the date picker fields to set your time range. A custom date range cannot be longer than 10 weeks.
- Minimum notice time: click the dropdown menu to select the minimum amount of time before a meeting that someone can book time with you.
- Buffer time: click the dropdown menu to select the amount of buffer time between each of your meetings. The buffer time prevents meetings from being booked too closely together. For example, if you have a meeting from 1:00 - 1:30pm and have a buffer time of 30 minutes, the next available meeting time would be 2:00pm.
- Start time increment: set the frequency of your meeting start times. For example, if you are available between 10:00am and 12:00pm for a 60 minute meeting and your start time increment is 15 minutes, a prospect can book 60 minutes with you at 10:00am, 10:15am, 10:30am, and so on.
- Booking page language: select the language that the scheduling page should appear in. If a visitor’s browser settings can’t be detected, your scheduling page will appear in English.
- Date and time format: the date and time will be formatted in the same language selected for the booking page language.
-
- Click the Form tab to customize the form contacts will see when booking a meeting with you.
- If a form is submitted via a meetings link, a unique email address will always create a new contact, regardless of if an existing contact has a matching user token. In this case, the existing contact's email address will not be overwritten by the new email address.
- To add a simple text field question, click Custom question. Enter a question, then click Save. To make the field optional, clear the Required checkbox to the right of the field.
- To add an existing contact property as a field, click Contact property. This allows you to add different field types to your form. If you need to create a new property for this field, learn how to create custom properties. Select a contact property from the dropdown menu, then click Save. To make the field optional, clear the Required checkbox to the right of the field.
- To add a CAPTCHA challenge to the scheduling page to prevent spam submissions, click to toggle the CAPTCHA (spam prevention) switch on.

.png?width=688&height=229&name=Knowledge%20Base%20Contact%20Us%20CTA%20(4).png)