
Each CRM object in HubSpot (contacts, companies, deals, and tickets) has an index page that displays the object’s records. Depending on your subscription, you can also filter and segment your custom object, call, and payment records on their respective index pages.
These index pages also include actions and filters you can use to customize and segment your records. Learn more about creating CRM records in HubSpot.
View records and access saved views
-
Navigate to your records:
-
Contacts: In your HubSpot account, navigate to Contacts > Contacts.
-
Companies: In your HubSpot account, navigate to Contacts > Companies.
-
Deals: In your HubSpot account, navigate to Sales > Deals.
-
Tickets: In your HubSpot account, navigate to Service > Tickets.
- Payments: In your HubSpot account, navigate to Sales > Payments > Payments.
- Calls: In your HubSpot account, navigate to Contacts > Calls.
- Campaigns: In your HubSpot account, navigate to Marketing > Campaigns.
- Forms: In your HubSpot account, navigate to Marketing > Lead Capture > Forms.
-
Custom objects: In your HubSpot account, navigate to Contacts > [Custom object]. If your account has more than one custom object, hover over Custom Objects, then select the custom object you want to view.
-
-
If you’re viewing an object with pipelines (deals, tickets, or custom objects), to toggle between a list view or board view, click the list View list and grid board icons next to the object name. The list view shows all records in a table, while board view shows records moving through the stages of a pipeline.
-
When navigating to an object index page, you’ll be brought to the default view for the object. When you first navigate to the index page, the default view shows the entire list of object records, but you can edit your default view. If you're a super admin, you can also set the default view for new users.
- To locate a specific record, enter a search term in the search box in the top left of the view.
- To change the order of your records, you can sort them based on a property. Click the property's column header to sort by that property. Learn how to customize which properties appear as columns, or how to sort records in board view.
-
To select a saved view:
-
To access an open view, click the view's tab.
-
To open a saved view not shown as a tab, click +Add view, then select a view from the dropdown menu.
-
If you’re in board view, click the [Current view name] dropdown menu, then select a view.
-
- If you're viewing deals, a summary of the view's amount properties will appear above the table or board. To hide this summary, click Hide insights in the top right. If it's already hidden, click Show insights to display the summary again.
- To preview a record, hover over the record and click Preview. The right panel will display the About this [record] section properties, pinned, recent, and upcoming activities, as well as the record's associations and attachments.
- To access a record, click the record name.
Filter records and save views
For each object, you can segment records based on that object's properties.
- Navigate to your records or a specific view.
-
To add or change the filters in the view, use the property dropdown menus at the top of the table or board:
-
To filter by a common default property, click the default property dropdown menus above the table (e.g., Contact owner, Create date, Last activity date, Lead status for contacts) and select filter criteria.
-
-
-
To filter by the object's other properties, click Advanced filters. In the right panel:
- If you have quick filters selected, they'll appear at the top. Click Hide to remove them from the panel.
-
-
-
-
Click +Add filter to set up a new filter, then search for and select the property you want to filter by.
-
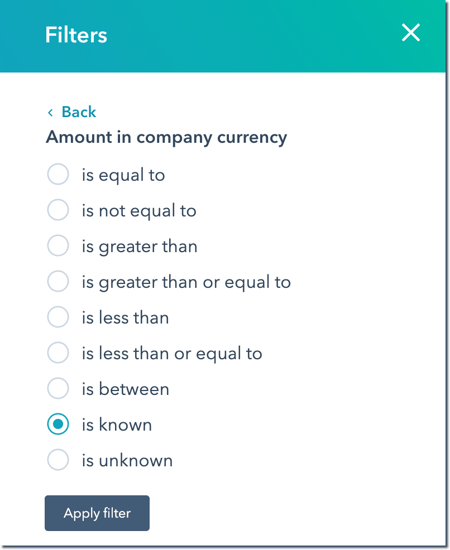
Set criteria for the selected property, then click Apply filter. Learn more about setting criteria.
-
To select another property, click AND or OR. When you set a filter with AND, records must meet all of the criteria in the filter group in order to be included in the view. When you select OR, the records must meet the criteria in at least one filter group to be included in the view.
-
-
-
-
- To duplicate a group of filters, click Clone above the group. When you clone a group, the new duplicate group will follow OR logic.
-
-
-
-
To remove a property, hover over the filter and click the delete delete icon.
- To remove a group of filters, click Delete above the group.
-
-
-
-
-
Once you’re done, click the X in the top right corner.
-
-
To clear all filters from a view, click Clear All above the table.
-

-
To save the current filters and settings, in the top right, click Save view:
-
-
To update the filters and settings for the current view, click Save.
-
To save these filters and settings as a new view, click Save as new. In the dialog box, enter a view name, select a visibility setting, then click Save.
-
To reset the current view to its original saved filters, select Reset. This will remove any new filters you've applied to it.
-
Once you’ve set filters, learn more about bulk editing records from an index page.
Select filter criteria
On each index page, you can only filter by that object’s properties.
To set your criteria in a view, click Advanced filters, then in the right panel, select a property. Depending on the property's field type, choose an option to set criteria for that property:
-
contains exactly: enter a value. A record’s property value must contain the exact text entered to be included in the view. To search for a value with multiple words in a specific order, or including non-English characters, you'll need to enter your value in double quotes (e.g., "HubSpot knowledge base") to filter for an exact match.
Please note: non-alphanumeric characters included in criteria values are treated as delimiters, not as characters themselves. For example, filtering by HubSpot_knowledge_base> will search for values containing HubSpot, knowledge, and base, treating the _ and > as spaces. Even if you use double quotes, such as "HubSpot_knowledge_base>", it will search for values containing "HubSpot knowledge base" in that exact order, but not for values containing the other characters.
-
doesn’t contain exactly: enter a value. A record’s property value must not contain the exact text entered to be included in the view. Records with no value for the property will also be included.
-
is: for Date properties, select from predetermined options (e.g., Today, Yesterday, Last quarter). A record’s property value must be within the selected time frame to be included in the view.
-
is after: for Date picker properties, select a date on the calendar. A record’s property must have a date value that is after the selected date to be included in the view.
-
is any of: select multiple values. A record’s property must have at least one of these values to be included in the view.
-
is before: for Date picker properties, select a date on the calendar. A record’s property must have a date value that is before the selected date to be included in the view.
-
is between: for Date picker properties, select two dates on the calendar. A record’s property must have a date value that is equal to or after the first selected date and equal to or before the second selected date to be included in the view.
-
is (not) equal to: enter or select a value. A record’s property must (not) be equal to this value to be included in the view. If you’ve selected is not equal to, records with no value for the property will also be included.
-
is greater than: for Numerical properties, enter a number. A record’s property must have a value that is greater than the entered number value to be included in the view.
-
is greater than or equal to: for Numerical properties, enter a number. A record’s property must have a value that is greater than or equal to the entered number value to be included in the view.
-
is known: all records with a value for the property will be included in the view.
-
is less than: for Numerical properties, enter a number. A record’s property must have a value that is less than the entered number value to be included in the view.
- is less than [x] days: for Date properties, enter a number, then select days ago or days from now. A record's property must have a date value less than that number of days before or after today's date to be included in the view.
-
is less than or equal to: for Numerical properties, enter a number. A record’s property must have a value that is less than or equal to the entered number value to be included in the view.
- is more than [x] days: for Date properties, enter a number, then select days ago or days from now. A record's property must have a date value more than that number of days before or after today's date to be included in the view.
-
is none of: select multiple values. A record's property must have a value that does not match any of the selected values to be included in the view. Records with no value for the property will also be included.
-
is unknown: all records that do not have a value for the property will be included in the view.
Once you're done, click Apply filter.
Customize a view's columns or board cards
To customize how properties appear in list view:
- In list view, click Edit columns in the top right of the table. In the dialog box:

-
-
On the left, select the checkboxes next to the properties you want to appear in the table.
-
On the right:
-
Use the drag handle to drag and drop properties to reorder the columns.
- Hover over a property, then click Move to top to make the property the second column in the view. By default, the record's name will be the first column and cannot be removed.
-
-
-
-
-
Click x to remove a property.
-
-
-
-
- To freeze the first column of the view, select the Freeze column above checkbox. When frozen, the column containing the record's name will remain visible as you scroll to the right.
-
Click Apply.
-
To maintain the same column settings for the view moving forward, save the view.
-

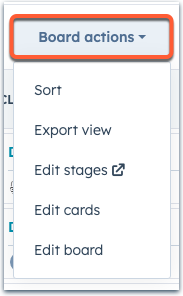
- In grid board view, click the Board Actions dropdown menu:
-
- To sort cards based on the records' values for a specific property, select Sort. In the dialog box, select a property and the criteria to sort by (e.g., Most recent value for Create date, High to low values for Deal amount, etc.).
- To edit the stages in your pipeline, select Edit stages.
- For deals, to edit the formatting or preferred currency of amounts, select Edit board. In the right panel:
- Toggle the Show formatted amounts on the board switch on to simplify the deal amounts in your pipeline columns.
-
-
- To set a preferred currency for viewing deals (Starter, Professional, and Enterprise only), click the Preferred currency dropdown menu, then select a currency.
- Once you've updated the settings, click Save.
-
-
-
To customize how the cards appear, select Edit cards. In the right panel:
-
Choose the card style to customize the amount of information shown in each object card.
-
-
-
-
-
Select the checkbox to display icons for associated records.
- Select the checkbox to display object tags (Sales Hub Starter, Professional, and Enterprise only).
-
-
-
-
- Toggle the [Deal/ticket] activity information switch to choose whether or not to display next and last activity information.
-
Toggle the Inactive cards switch to set options for marking deals and tickets as inactive.
-
Once you're done, click Save.
-
Edit, delete, clone, or set default views
As you filter your records and save views, you can customize which views appear as tabs on object index pages, create new views, and set a default view for each object. You can also manage who can access a view, set your own default view, clone views, and delete unneeded views. Users with super admin permissions can also set which views appear for new users by default.-
Navigate to your records.
-
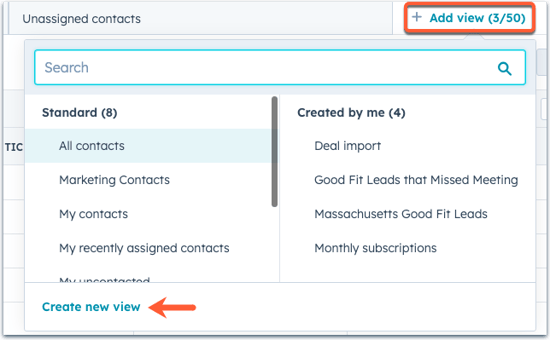
To create a new view with no filters set, click + Add view to the right of your tabs, then click Create new view.
-
To open an existing saved view, click + Add view to the right of your tabs, then select a view from the dropdown menu. Once opened, tabs automatically remain pinned on the index page unless you close them.

- To reorder your views, click and drag a tab to a new position.
- To set a default view, click and drag the view's tab to the left most position. This view will be the first tab to appear each time you navigate to the index page. For deals, tickets, and custom objects, the default view will be set for both list view and board view.
- To close a view, click the X on the view's tab. You can reopen the view from the Add view dropdown menu or the All views page.
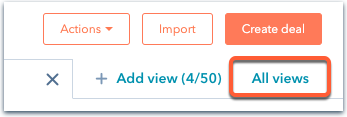
- To manage all saved views in your account, click All views.
- On the All Views page, your own custom views are shown for the object you were viewing.
- To filter by other objects, click the Object type dropdown menu and select the objects you want to include.
-
- To filter by certain view owners, click the Owner dropdown menu and select the users whose views you want to include. Users with super admin permissions will be able to see all views, while other users can only see views they have access to.
- To retrieve all views regardless of the object or owner, clear all checkboxes in the dropdown menus.
-
- To open a view on an index page, click the name of the view. On the index page, you can edit the view's filters.
- To view a preview of the views sharing settings and filters, hover over the view and click Preview.
-
- To edit or delete a view, hover over a view, then click the Actions dropdown menu. Select from the following:
-
-
- Delete: delete the view. In the dialog box, click Delete to confirm. The view will be deleted, but the records included in the view will not be deleted.
- Create report (Professional and Enterprise only): navigate to the report builder to create a report based on data from the view. You cannot create a report based on data in a calls or payments view.
- Clone: clone the view. In the dialog box, enter a name for the cloned view, then click Save. A new view will be created with the same filters.
-
-
-
- Export: export the records in the view. Learn more about exporting records.
- Manage sharing: update which users have access to the view. In the dialog box, select to make the view private, share it with your team, or share with all users in the account. Click Save to confirm.
- Rename: update the name of the view. In the dialog box, enter a name, then click Save.
-
-
- To view HubSpot-created views, click Standard views in the top right. In the right panel:
- Click an object to expand the object's standard views.
- To open a view on an index page, click the name of the view.
- Hover over a view and click Actions to clone or export the view. Depending on the view, you can also create a report (Professional and Enterprise only).
- If you’re a super admin, click the Default views tab to set up an object’s default view order for new users.
- To view HubSpot-created views, click Standard views in the top right. In the right panel:
.png?width=688&height=229&name=Knowledge%20Base%20Contact%20Us%20CTA%20(4).png)